Pages

Showing posts with label pouch. Show all posts

Friday, June 17, 2016

Finish It Up Friday: Happy Mail and a Happy Pouch!

Howdy y'all! All the posts I tried to create the last couple of weeks have fallen flat as a flitter. It just wasn't working. Motivation to sit behind a computer and write blog posts has been low when it is so pretty outside! But then some happy mail came this week.

It all starts with a quilter. That's always how it starts, right? ;) This particular quilter is Svetlana over at s.o.t.a.k handmade. Svetlana is a fabulous pattern designer, quilter, and lately, fabric printer. She is probably best known for her unique pouches. Svetlana is one of those creators that has a distinct style - you can see a project and just know it's one of her creations. Anywho, after commenting on one of her posts, I got the surprise of her insisting on sending me some Clover Clips! I had never used them before and she had a box she wanted to send to a new home! :D
Quilters really are the nicest, most generous people in the world.
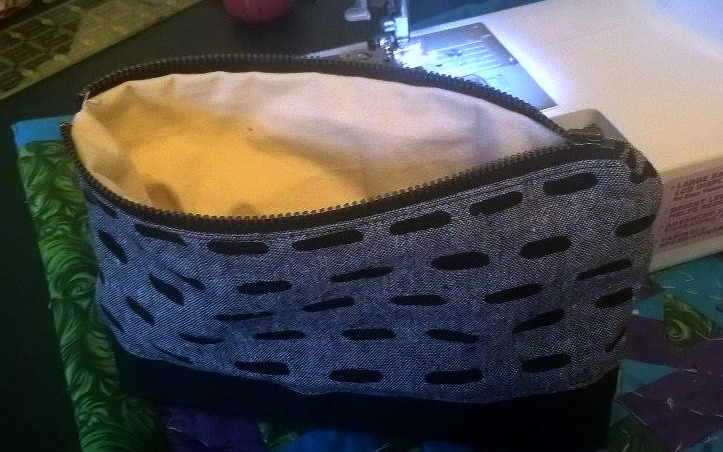
So later in the week, I got my happy mail. But there wasn't just the Clover Clips! There was also a charm pack (Marmalade by Bonnie and Camille) and a Sotak Kit! For those of you who don't know, a Sotak Kit is something Svetlana has put together so you can make your own pouch, Sotak-style! It includes all the fabric and odds and ends you need. Mine had waxed canvas, a linen for the lining, some of her printed fabric (!!!), a metal zipper, and the signature leather zipper pull. It also had instructions on how to make the pouch in a nifty little pamphlet.
I'm in love with her printed fabric!

My pouch making is pretty limited, but I dug right in and made this little beauty in no time! I had such fun working with new materials (waxed canvas is different but I love it!) and never felt lost in the instructions. And I got to use those new Clover Clips along the way!
This was my first time doing box corners on the bottom of a pouch, so it stands up on its own!

I know May is for Makers is past, but I believe wholeheartedly in cheering on our fellow makers all year around, so I wanted to shine the spotlight on Svetlana for being an awesome quilter/sewist and also for just being a lovely person. This bit of happy mail really turned my week around and got me at my sewing machine with happiness in my heart. And for that, I thank her with all the virtual hugs I can send her way! :)

Linking up with Finish It Up Friday and NTT!

*Note: I was not paid or given any compensation for this review. In fact, I wasn't even asked to give it! I just wanted to share an awesome product with fellow sewing buddies who may want to make pouches as well. :)

Tuesday, December 15, 2015

Don't Let the Cat Out of the Bag: A Pouch for Secret Santa

Howdy y'all! I told you I wasn't done with my crazy sewing yet! This post is less impressive than my quilt finish (if I had the time, I'd sew myself a trophy! LOL), but I am proud of it for different reasons.
Literally all the pens in my pocket plus my label making pen. Not enough energy to come up with good props. Lol.

My work hosts a Christmas party every year and part of the festivities is a Secret Santa gift exchange! I love surprises and giving gifts, so Secret Santa is right up my alley! To make it easier, everybody is supposed to list a few things they like to help out the person who draws their name. This year, the person I drew wasn't working the day we wrote down the clues, so all I had to work on was 'Cats'. Yes, that's right. Cats.

Soft kitty, warm kitty, little ball of fur...happy kitty, sleepy kitty, purr purr purr...

I decided on a pouch as a starting point fairly quickly. I've only made one pouch before, but I found this uber cute flannel with cats on it and before I knew it, I had the flannel and a zipper at the checkout of Jo Ann's. I found a basic tutorial here, but I definitely pulled from Svetlana's tutorial that I used in my first pouch. My first pouch (made wayyyyy back here) was a bit rough in construction, but it helped me think about how I wanted to improve. I knew I wanted to add zipper tabs (I used this tutorial as a guide and found it quite helpful) and I wanted to clean up the close on the lining. All those orange peel blocks paid off because I used the same ladder stitch to make that invisible finish! :)
I've never been prouder of stitches I can't even see!
I also added a neat-o little label on the inside. For some reason, it made my bag feel fancier, even if the label was hand written. :) When I set my two pouches side-by-side, I couldn't help but be proud of the improvement I saw. I don't like to brag, but I really feel like I'm growing in my sewing and quilting. It really made my day when my Mom was talking about my quilting and she talked about the differences she could see. I know she was comparing a quilt I made her in Janurary versus Missed Punchline finished recently, which was for her mother. And thing is, until she pointed it out, I hadn't noticed the differences!
One of a kind, LBCQ original!
Sorry for the rambling, but I know you guys will understand where I'm coming from! Hope you guys have an awesome week. If you're working on Christmas sewing, what are you making? How close are you to meeting your deadline?

Happy Sewing, y'all! :)

Thursday, May 14, 2015

Finish It Up Friday: Scrappy Pouch!


TGIF y'all! For the first time in forever (any Frozen fans out there?), I get the ENTIRE weekend off! I plan to use that lovely time off for sewing and reading since the weather is supposed to be less than superb in my neck of the woods. Despite that, I stayed up late Thursday night to finish this pouch for today! I used this tutorial to use the slab I showed you guys from Wednesday.
 I ended up adding some more to it to make it taller because I was a bit of a dum-dum and bought too big of a zipper. Derp!

I found another little bird in my scrap bin!
I was also a bit lazy and didn't pin or baste my zipper in place before sewing because my pins were downstairs and I was tired of tromping up and down the stairs getting this-n-that. And, surprisingly, I don't think it looks too bad. I could have gotten a bit closer to the zipper teeth, but I was worried about hitting the teeth and destroying my only zipper. I also trimmed a little off the ends of my zipper thinking it would reduce bulk, but it actually made it sit kind of funny afterwards. Lesson for the books when I make another one!
Aren't those polka dots darling?!
I knew exactly what I wanted to use for the lining of this colorful bag! I wanted it to look like a rainbow puked on it, inside and out, so these cute dots were the perfect choice for me. It was a fat quarter I picked up at...well...Walmart. Do quilt bloggers buy fabric from Walmart? Most of the bloggers I follow seem to be online shoppers or buy from their LQS. My budget isn't quite up to that standard yet. When I saw this little fat quarter, I couldn't pass it up, it was just too darn happy!


One last shot with a little pitcher I made in a college ceramics class. It helped the pouch catch the kitchen light juuuuuuust right I feel like. It made that blue zipper pop too! So what about you, any fun plans for this weekend?

Linking up with Needle and Thread Thursday , TGIFF, and Finish it Up Friday

Wednesday, May 13, 2015

WIP Wednesday: Trying out Quilt As You Go


Happy Hump Day y'all! The beginning of my week has been busy at work, so my feet and knees are already sore. Luckily, I got Wednesday off, so I get to have a little fun today. On Monday and Tuesday, I worked on this little QAYG (Quilt as you go) slab using this tutorial from Svetlana at S.o.t.a.k Handmade. It's a great tutorial, you should definitely check it out! I've never tried QAYG and was able to make this slab without any problems. Then, much to my delight, Svetlana also posted a tutorial on how to turn that slab into a pouch. If you've seen her pouches, you can understand my excitement! They are gorgeous and, no matter how many you look at, when you see one of hers, you know it's hers. It has a sort of...distinction?

My favorite part of the slab is this wee fox! :)

I couldn't resist sliding a little shark in too! He's from a quilt I made my cousin for Christmas. :)


Anywho, back to my slab! I've got it made, but I didn't have a zipper to start making a pouch. :P Thankfully, I'm having a shopping trip, armed with Jo Ann's coupons, so I should be coming home filled to the brim with crafty goodies. Yay!! See you back here Friday with a finished pouch (hopefully!)!


Linking up with Freshly Pieced!